How to Installing and setup GoPhish on Kali Linux
Gophish is an open-source phishing
toolkit designed for security professionals to conduct penetration tests
and awareness training. Developed with user-friendliness in mind, Gophish
allows users to easily create, launch, and manage phishing simulation
campaigns. It provides a web-based interface where users can design
customizable email templates, landing pages, and email lists. Gophish’s
real-time reporting and analytics capabilities enable detailed
tracking of campaign metrics such as email open rates, link clicks, and
submitted credentials, helping organizations assess their vulnerability to
phishing attacks. Its flexibility and ease of integration make it a valuable
tool for enhancing cybersecurity awareness and testing organizational defenses
against social engineering threats. The tool supports various deployment
environments, ensuring adaptability to different IT infrastructures. Gophish's
comprehensive features make it an essential resource for enhancing an
organization’s cybersecurity posture through effective simulation and training.
Installation :-
GoPhish is now available on Kali Linux repository so we just need to run following command to install it:
“sudo apt install gophish -y”
It requires password of user for authentication. In the following screenshot we can see the screenshot of applied command:
Now we can run GoPhish on our Kali Linux system by using following command:
“gophish -h”
Now we can go to browser and open local user https://127.0.0.1:3333
Enter username = admin and password = kali-gophish
After then create new password
We can see dashboard of Gophish
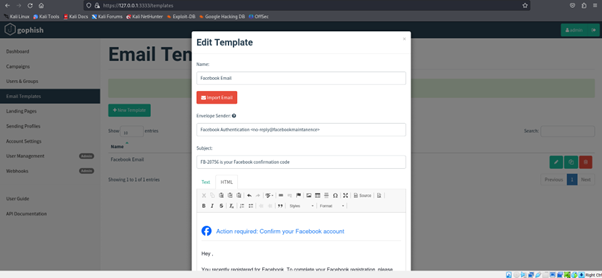
Then, click on Email Template option from the left Pane & Click on New Template button.
After that, A new pop-up window will appear. Type Name, Sender Email, Subject & Message in the fields. If you want to add some files in the E-Mail then click on Add file & select the file which you want to add, otherwise click on Save Template.
After Click on Save, it will appear in Email Template Page.
Gophish requires you to configure SMTP relay details called “Sending Profiles.”
Click “Sending Profiles” in the navigation, then click the “New Profile” button.
Make sure to set up your “Host” in the full host:port format.
Click the “Send Test Email” button to test your SMTP configuration once you are done with all of the previous steps.
After hitting “Send” you should get a message stating that the email was sent successfully.
Click on “Landing Pages” on the sidebar, then click the “New Page” button to create a new landing page.
The landing page editor supports the HTML editor available in the Templates section.
To create your first group, go to the “Users & Groups” tab in the navigation bar and click the “New Group” button.
To create a new group, you need to add a unique group name, and add at least one recipient.
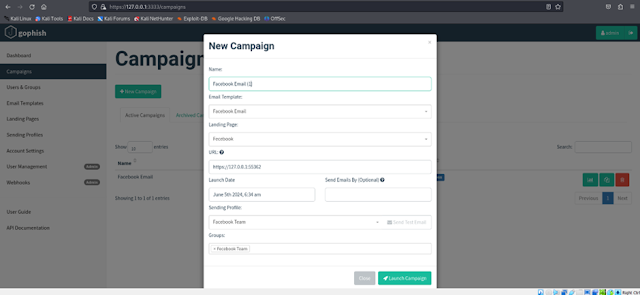
To create your campaign, go to the navigation bar and click on “Campaigns."
Here is a list of required fields in the Campaign section:
Name – Create a name for your campaign.
Email Template – The email that is sent to the recipient group.
Landing Page – The HTML page that recipients are forwarded to when they click the URL in the email template.
URL – The URL that is contained in the {{.URL}} value in the email templates. (use your os ip for use in LAN netwotk)
Launch Date – The date that the campaign will begin.
Send Emails By – The last date that campaign emails are sent.
Sending Profile – The SMTP configuration used to send emails.
Groups – The recipients of the campaign.
Gophish allows you to launch and monitor multiple campaigns at once in its dashboard.
Krunal Gaudani


Comments
Post a Comment